When I first started off as a content marketer, I managed my editorial workflow in a combination of Google Sheets and Docs. It was good in theory, but terrible in reality.
My system didn’t accommodate for missed deadlines, long-term planning, or any of the post-submission tasks I had to do once a writer turned in an article. I also hated that I couldn’t actually view my editorial calendar on, well, a calendar.
I needed both a better workflow and a better tool.
To solve this, I transitioned my writers and content to a CMS (GatherContent)…
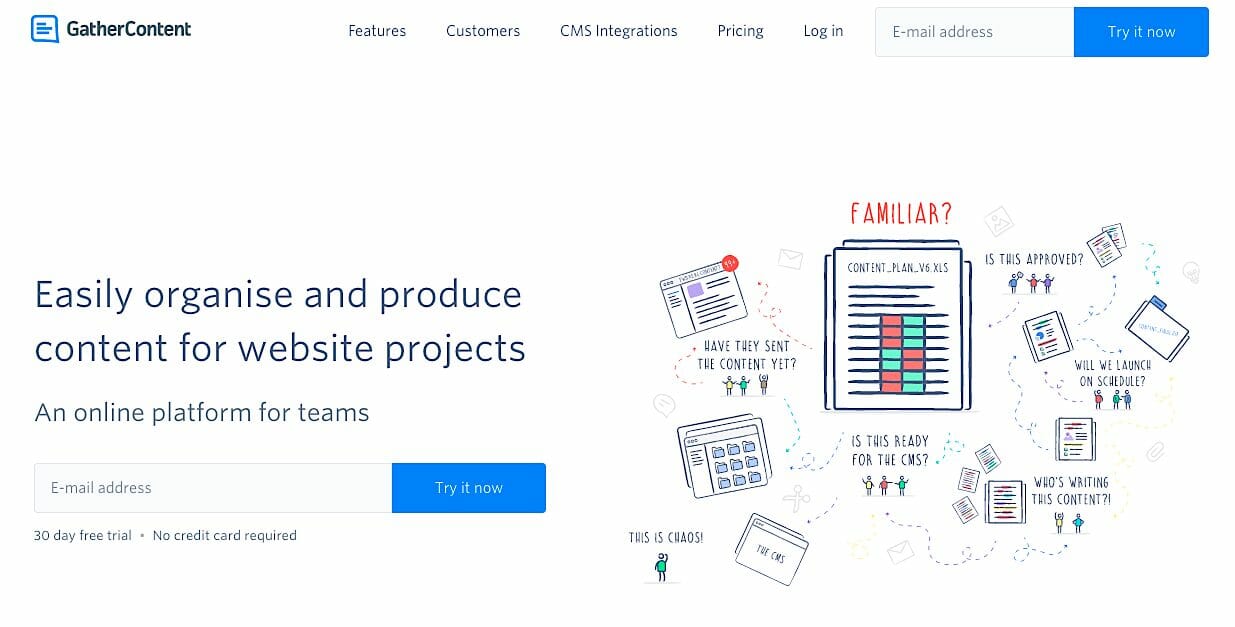
…and a work management tool (Asana):

As soon as I did this, e-mails from my writers asking about deadlines, assignments, payments, and publication dates virtually ended. I stopped losing submissions and spending hours trying to dig up an article’s status. I could also easily loop in our designer and social media manager on a piece of content and give them instant context.
For marketers, a well-organized workflow can save a tremendous amount of time, effort & stress. Share on XIf you are starting to feel the pain of a broken-down system, or just want to increase your efficiency, read on. In this post, you’ll find a list of common marketing workflows, tips on organizing them, and ready-to-use templates.
1) Editorial Calendars & Content Production
On the surface, content production looks pretty simple. Come up with an idea, write it, publish it, and share it. Right?
Sure, until you start thinking about all the smaller steps within each of those buckets: brainstorms, copy editing, design assets, copy for the social shares – the list goes on. Then, of course, you realize that you’re not just doing this once; you’re doing this for each and every piece of content.
Things just got complex – and fast.
To keep a handle on it all, you need a thorough and replicable content production workflow. A good place to start is by outlining all the steps you take for a single piece of content, then find ways to scale and coordinate your entire editorial calendar.
For example:
Ideation
- Gather ideas and pitches from freelancers, in-house writers, and other relevant co-workers. This might take shape as a quarterly call with freelance writers or structured brainstorming sessions with co-workers.
- Prioritize your ideas and decide which ones you’ll publish in the next month or quarter, but leave room for timely, last-minute pieces as they come up.
- Do a search analysis to refine your topic, learn about your audience, figure out the unique value of your content, and target search queries you’ll want to rank for.
- Create a more detailed pitch or outline based on search analysis and feedback from the team.
Creation
- Write the draft. Allow time for the writer to complete the piece.
- Request design elements. It’ll speed up your process if you have your design assets in hand when the written content is ready.
- Round one edit. Take a first pass at the copy and design and give feedback as needed.
- Send invoice [for writers]. If you’re working with freelancers, be sure to work an invoicing step into the process. Be clear about when they should submit their invoices (once a month? after each submission?) and how.
- Implement edits as needed. After notifying the writer of changes needed in a previous step, you’ll now receive the revised copy, review it, and implement it.
- Final review and copy editing. Before publishing, copy edit the piece and do a final review.
Publication
- Stage the content on your website. It’s also a good idea to have a very detailed checklist of what this stage looks like since it includes lots of small details. Does the person in charge of staging have to follow specific formatting guidelines? Add “alt text” to images? Write the meta description? Make sure every link opens in a new tab?
- QA your content. Quality assurance is important if you want your blog post to look professional, so it’s always good to have a second set of eyes double check that everything is as it should be (images have uploaded correctly, subheads are a consistent size, numbered sections are chronological, links are working). If your content is link heavy, you can run it through a free link checker.
- Publish! Need I say more?
Distribution
- Notify the writer and your team. I used to send a quick e-mail to my writers after publishing their articles, but I’ve streamlined that process by adding them as followers to specific Asana tasks. When I complete the task, they get an automatic notification and the go-ahead to start sharing their piece.
- Assign distribution tasks to channel owners. For every post, create a reminder for your baseline distribution tasks, like scheduling social media posts, including it in an e-mail newsletter, or sending it to a list of engaged influencers.
- Monitor and refine. Most people forget this last step. Watch the performance of your content and look for opportunities to better optimize each piece.
When put into action with due dates, assignment owners, etc., this workflow will become your editorial calendar.
For example, in Asana I have a project for all our blog posts: I create a task for each post, a subtask for each step in the workflow of that post, and a due date (which is the publication date) for each task.
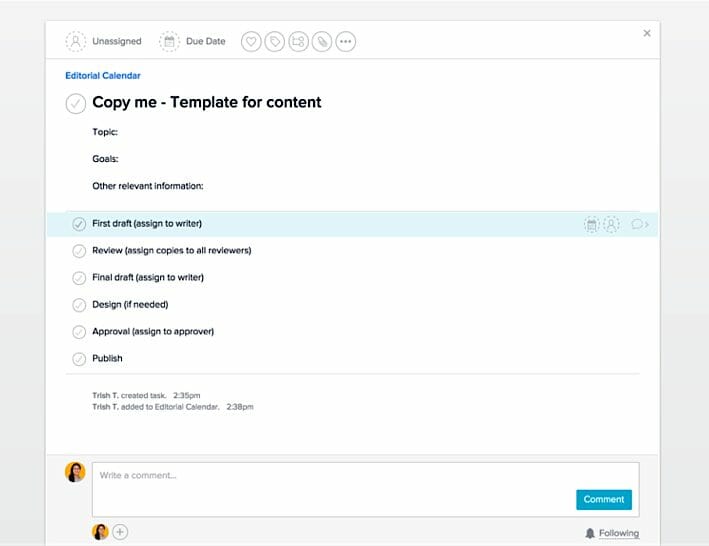
Then, when I view the project in calendar view, I can see my editorial calendar at a glance:
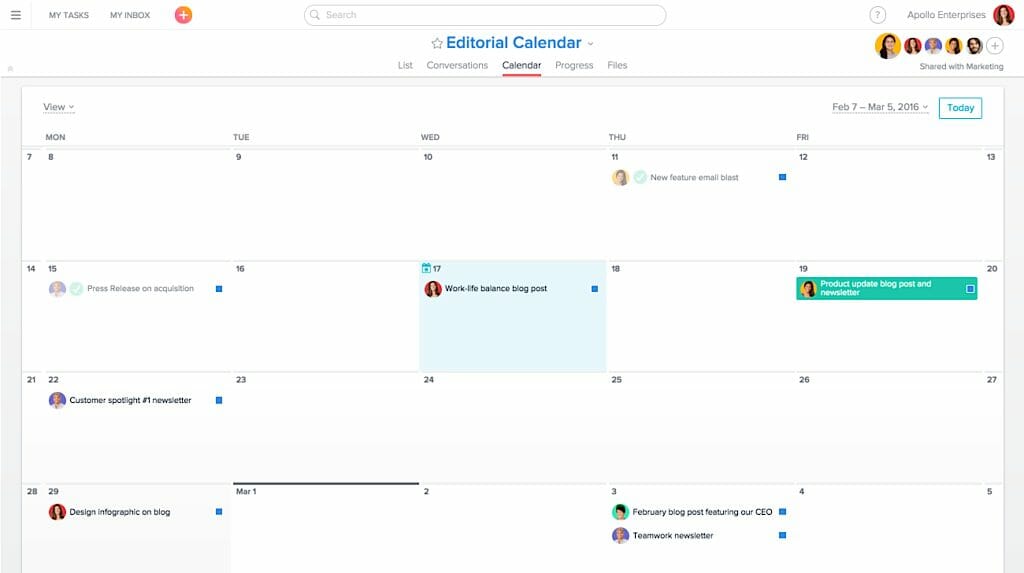
Bonus tip: If you’re dealing with multiple types of content and publication platforms (blog articles, landing pages, company profiles on a listings website, whitepapers), use tagging and labels to keep them all straight.
Learn More: How to Use an Organized Workflow to Stay on Top of Your Content Marketing
2) Social Media Marketing
Between Facebook, Twitter, Pinterest, LinkedIn, Instagram, Snapchat, etc., social media management takes creativity, flexibility, and world-class organizational skills. Not only are you the idea person (“Hey! I’ve got a great new concept for a Facebook video!”), but you’re also an air traffic controller who must ensure that your company’s messages go to the right place at the right time with the right copy, image, or video.
For social media workflows, I find it helpful to break it into three main categories:
Social Shares and Requests
This is the nuts and bolts of your social media marketing: the posts, Tweets, videos, and content that go out on your networks. Usually, this social media work is attached to other team initiatives (i.e. a blog post, new job opening, or PR win we want to share) and other members on the marketing team can make the requests.
Rather than have teammates Slack/e-mail/drop by your desk and ask “hey, can you Tweet out this article?”, it’s best to create a system for receiving and triaging requests for social shares. For example, you could use this workflow:
- Receive and add requests on a rolling basis.
- Prioritize requests daily or weekly.
- Schedule social posts with a tool like Buffer, Hootsuite, or Sprout Social.
- Check your calendar to make sure you have a good balance and cadence of posts going out.
- Archive (but don’t delete!) old requests. This way, you’ll have a repository of older but evergreen content you can share during slow times.
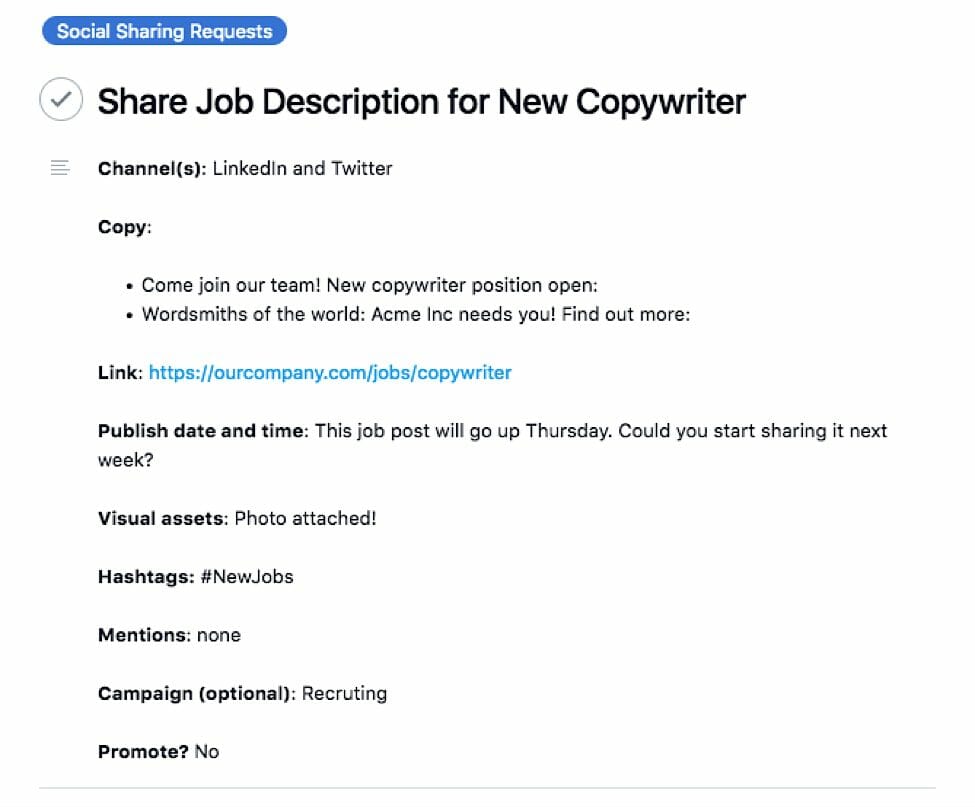
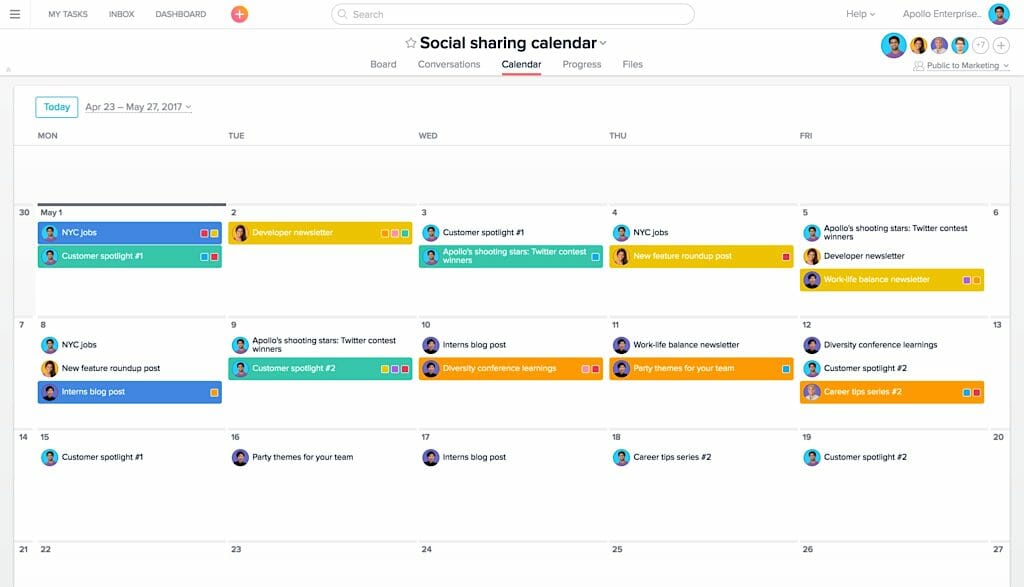 For receiving and creating requests, I have a “form” that I’ll fill out for every new piece of social content (or have teammates fill out when they’re asking for a social media share). Using Asana, people will create a task with the following information in the task description:
- Channel(s): Which social channel should this go out on? LinkedIn? Facebook? No preference (i.e. up to the social media manager to decide)?
- Copy: What copy should you use with this post? Or does the person requesting need help writing it?
- Link: What link should this post include (if any)?
- Publish date and time: Is there a specific date/time this should launch on? If it’s part of a larger campaign, do you have to coordinate the social posts with the campaign launch? Is there an international audience you’re reaching and therefore need to be aware of?
- Visual assets: Is there a video, illustration, GIF, etc. you’re sharing with this post?
- Hashtags (for channels that use them): Are there any hashtags to use with this post?
- Mentions (for channels that use them): Are there any influencers, partners, or customers to tag?
- Campaign (optional): If the post is part of a larger campaign, it’s good to record this. It provides additional context and can help with future reports.
- Promote: Will you be sharing organically or paying to promote the post as well?
Bonus tip: Use a webform, like Google Forms or Wufoo, to receive social requests for your team. This way, they’re less likely to forget an important detail and you’ll have all the context you need to seamlessly move items from request to published. Even better, link the webform to your work management app and spend less time switching between tools.
Creative Campaigns and Experiments
Think of this as the “delight” section, where you manage the work you do to build brand love (i.e. fun social-only content, Twitter chats, or contests). This is the content you share on social to keep followers engaged and happy, but not necessarily clicking through to your website.
The workflow will be similar to your social media requests workflow – but with a few additional creative components. For example:
- Ideation: This is where you can get your creative juices flowing: what ideas do you have that would work great on social media? What problems could a social campaign help solve? Is there a timely event you could piggy-back off of? How? Brainstorm and choose an idea from which to build your campaign.
- Outline: With a more creative social post, like an Instagram story, this might mean drafting up a storyline – much like you would for a blog. If it’s something like a Twitter chat, then your outline will be more of a step-by-step playbook of who’s doing what and when.
- Production: Write your copy or Twitter chat questions. Record your video. Gather community photos. Put in a (well-detailed) design request for some custom illustrations.
- Approval (optional): If you work autonomously, you may not need this step. However, it’s always good to get an extra set of eyes on your social posts before they go out. Run it by a manager, co-worker, or designated approver to get a thumbs-up. If you’re doing anything live, move this step to before production.
- Scheduling: If you can, schedule posts in your tool of choice (Buffer, Hootsuite, Sprout Social). If you’re running a Twitter chat, for example, you could schedule all your questions to go out automatically so that you can spend more time participating while it’s happening. For live events, schedule a time on your calendar or create a task in your work management tool as a reminder to post your live content.
- Reporting: This step is so easy to forget! Follow up after your posts go out to see what was successful and what wasn’t. This will help you iterate on your social campaigns and figure out what really resonates with your audience and, as a result, what you should invest more of your time in.
The main difference in this workflow is that you might swap out the “receive request” step with an ideation or brainstorm step. Then include a step for making requests for creative assets, like videos or images, before you schedule your posts.
Analytics and Maintenance
This is where you measure social performance and followings, then take action to improve failures and build on successes. In this workflow, you’ll have recurring tasks that you’ll do on a daily, weekly, monthly, or quarterly basis. I use recurring tasks in Asana to help with these, but you could also create recurring calendar reminders.
Every day:
- Check social notifications and respond to customers. Go onto your social platforms and check notifications. Respond to customers/followers as needed and spend time engaging with your audience.
- Check on trends. Is there anything trending on social you could hop on board with?
Every week:
- Re-promote successful, evergreen content. Take a quick look at your top-performing content – especially on Facebook, Twitter, and Pinterest – on a regular basis and re-promote it. For this, I’ll use Buffer to sort the most successful posts and hit “re-buffer” to get this done quickly.
Every month:
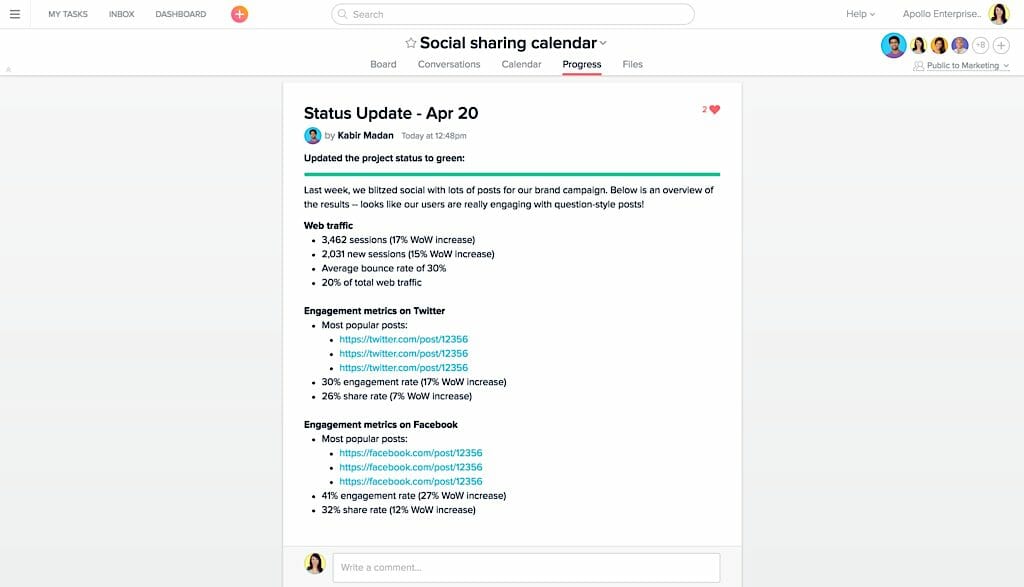
- Pull metrics on social engagement and following. Make sure you’re tracking your social media performance on a regular basis. What was the engagement rate on your posts? Has your following grown? By how much? Depending on the goals of your business, you might also want to track web traffic or in-platform purchases. Sprout Social has a great post on all the metrics you could track if you need more inspiration.
- Share status report with your team. Let others know how the social media front is doing. To save time, send it out as a quick status report or e-mail, rather than dedicating a meeting to it.
Every month/quarter:
- Update your lists of hashtags and influencers. Are there any new Instagram hashtags you should add to your list? A new influencer with whom you could engage?
Related Content: 26 Social Media Prompts that Get the Conversation Going
3) Search Engine Optimization (SEO)
SEO looks different for every company and website. Complicating things even more, the workflow to execute a successful SEO strategy rarely looks as straightforward as an event plan or as cyclical as a content calendar. For that reason, it makes the most sense to break up your workflow by task function, versus chronological order of execution.
The one exception to this is search’s role in your content production process.
You can (and should!) bake a search analysis step into the content production cycle to keep fresh content optimized. Share on XHowever, your holistic SEO workflow involves more than that. To keep track of all the various tasks involved, break up your SEO workflow into the following sections:
Analytics
This includes tasks like:
- Checking search analytics in Google Webmaster Tools
- Checking rankings reports in Moz
- Checking search traffic in Google Analytics
- Plus a monthly recurring task to report on progress
Maintenance
This includes recurring tasks like:
- Checking and fixing 404 errors
- Manually indexing high-quality UGC
- Plus one-off items, like a reminder to update your robots.txt file
Tests
This includes keeping track of all the tests you run like:
- When did you launch the test?
- Which metrics did you want to move?
- Can you create a reminder to check in and report out?
- Plus, set a reminder task a month in advance as search tests are notoriously slow.
Opportunities
List opportunities like:
- High-volume search queries
- Rich snippet opportunities
- Content updates to better optimize your site
- Plus, break it out by web property (i.e. blog, product pages, off-site content, etc.) and then make a point to triage and tackle one or some on a regular basis.
Technical
Creating a dedicated section for the technical component of your SEO strategy helps WebDev teams focus on just the things that matter to them. Use this section to track tasks like:
- An audit of your 301 redirects
- Updates to your schema markup
Trends
Search constantly changes, so make room in your workflow for keeping up to date on things like:
- The latest trends
- Algorithm changes
- Learning
SEO work always feels like a balance of action and ideas. While it’s easy to get caught up executing the baseline work you always have to do, make sure that you schedule in time to take action on your ideas. You’re likely stumbling on insights and gathering ideas as you go about your normal work anyway, so don’t just let them sit there!
Related Content: 12 Marketing Tools Guaranteed to Save You Time
4) Outreach and Link Building
Although technically a component of your search strategy, outreach and link building is best managed in a separate workflow. You’ll need a dedicated space to track all your outreach prospects, who you’ve already contacted, and the status of each outreach attempt.
Prior to moving to a work management tool, I used spreadsheets to manage outreach. This is a good starting point, but there are some parts of the process that a work management tool can automate (i.e. timestamps). They also make it easier to loop in co-workers to help with outreach.
I personally love using kanban boards – a workflow visualization tool – for outreach.
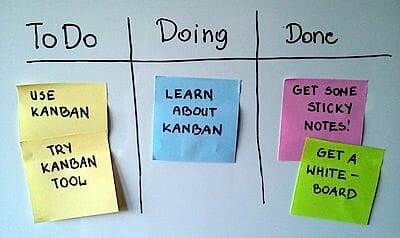
The above image is, of course, a simple physical example of a kanban board (how annoying would it be to write out a URL on a sticky note?), but modern online versions include Trello, Asana, and Basecamp.
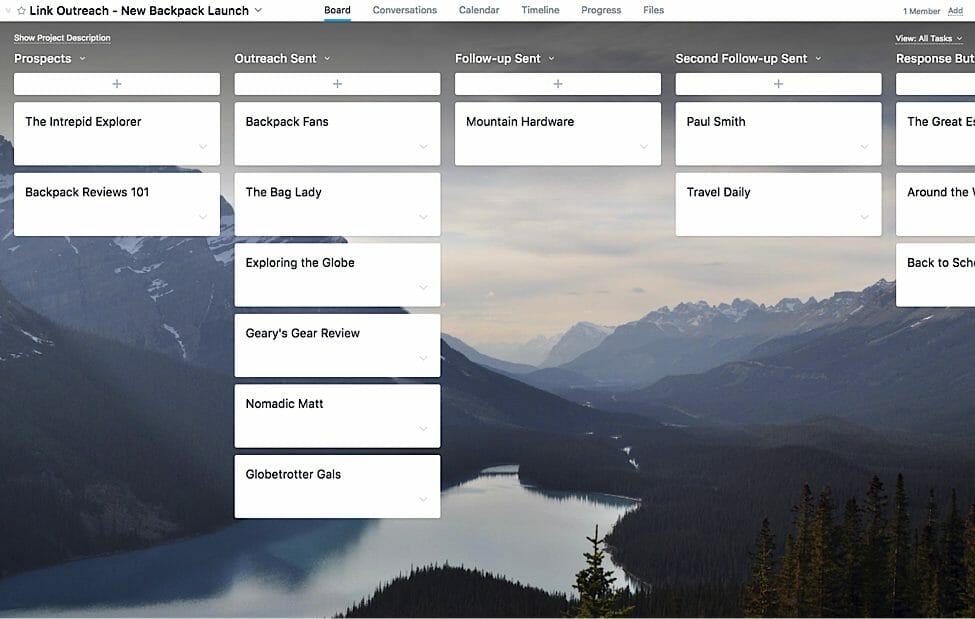
I’ll create a column for each stage of the workflow, then move prospects from column to column as I go. The columns I use are:
- Prospect. This is where I put newly identified prospects along with their URL, website/company name, contact info, domain authority, and any other notes.
- Outreach sent. Once I’ve sent the initial e-mail, I move the prospect here.
- Follow-up sent. Once a week, I’ll triage the “outreach sent” column and send a follow-up e-mail to prospects. Once that’s done, they get moved here.
- Second follow-up sent. I’ll usually follow up twice and repeat the process from the first follow-up here.
- No response. If we strike out and don’t get a response, the prospect gets moved to this column. This way, we have a record of who we’ve already contacted and can avoid reaching out to them in the future or tailor our response if we do.
- Response but no link. If someone declines to add a link, guest post, or work with us, they go here.
- Link won. This is (obviously) the best column. When a prospect agrees to add a link, I move them into this column. I’ll make a note of which page of ours they’re linking to and from where on their site. This is especially helpful if you need to report on the success of your outreach campaigns.
- Further action needed. This is a sort of “catch-all” column for prospects who turn into something more, like a sponsored post opportunity or a co-marketing campaign.
If you choose to use a spreadsheet to set this up, make sure you leave room for timestamps (which are usually automatic with work management tools). It’s always helpful to know when you last contacted someone.
If you organize your outreach by campaigns, turn this workflow into a template and reuse it.
Learn More: Effective Backlink Building with Blogger Outreach
5) Creative Requests
Creative requests get messy when they don’t live in the same place. They also become time consuming if the request doesn’t have all the necessary information you need to complete them.
For example: design requests that don’t tell you the required dimensions of an asset or distribution channel. Or a copy request for an e-mail or landing page that doesn’t give you much context about the project, goals, or audience.
To solve this, add a creative brief to your requests. Include:
- Goals: What are we hoping to do? What metric do you want to move?
- Audience: Who is this for?
- Creative considerations: Any guidelines to be aware of? Asset dimensions? Requirements?
- Channel: Where will this asset live / be shared?
- Timeline: When do you need it by?
- Stakeholders: Who is involved in this project? Who should the creative contact if they have questions?
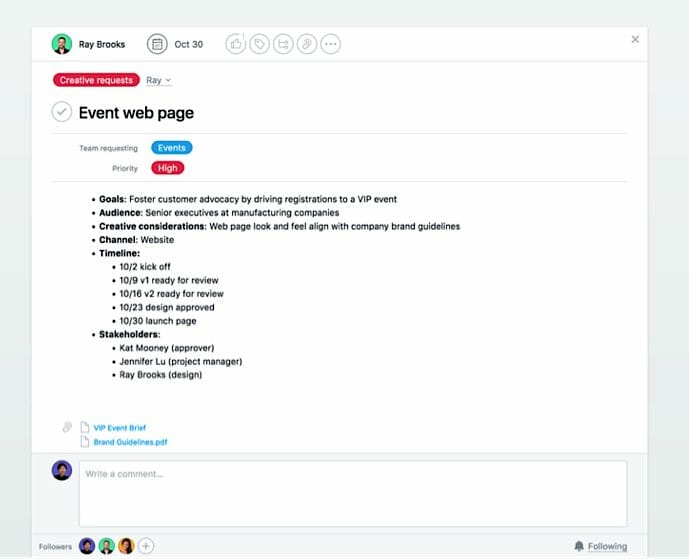
A well-organized and clear process can help both of these pain points. For your creative requests workflow, try this:
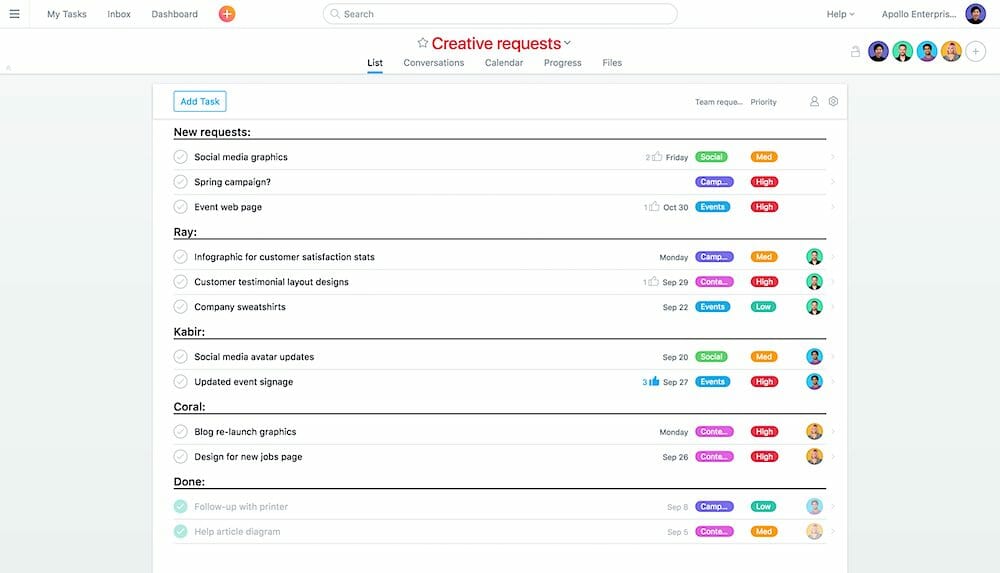
- Submit request via form: Include items like a creative brief, goals, specs, due date, channel, point of contact, estimated time, etc.
- Triage and organize requests in a central place. Assign requests to individuals and/or prioritize them by order of importance or due date.
- Host a quick “handoff” meeting to get clarity on less straightforward requests.
- Submit a draft to the person requesting an asset. Whenever possible, manage feedback and approvals together.
- Make changes if needed.
- Submit a final version.
As with your social media requests, you can streamline your creative request workflow by requiring co-workers to submit requests via a form.
It’s also helpful to have one person your team play the role of “scrum master”. This person will receive, triage, and organize all incoming requests. They can ask for more information where necessary, assign it to the best person to work on the request, and keep everyone on track.
Example of a creative request workflow we use:
Conclusion
Setting up a workflow for yourself and your team always takes a bit of upfront work. However, the time spent on creating a clear process, setting expectations, and organizing your work will save you time in the long-run.
Say goodbye to endless back-and-forth e-mails from co-workers, forgetting small but important details, or not knowing the status of, well, anything. Workflows are your new secret weapon. Use them.


